 |
This page is specifically for Windows 64 bit users.
(Windows 8.1 10 & 11)
This page was composed with lots of help from LilJoe in #bambamsden. Without him this page could not exist!
If you have the 32 bit version of Windows 10, then then go HERE for help.Microsoft's release of the "Windows XP Mode" package is a 32 bit system and therefore will function in Windows 10-32 bit operating systems.
Directory:
Install VirtualBox | Install Windows XP | Install Character Editor | Help Sites | OVB Errors
LINUX? ==> Additional Information provided by Dark AlchemyXE - Regarding Win 10, 11 & Linux Installs: Pdf:
1 - 2
The below instructions can also be used to successfully install and operate ANY older 16-bit program in Windows 10 x64!
|
 |
INTRODUCTION
 |
These are instructions which will enable a Windows 64 bit (Win 8.1, 10, or 11) user to successfully use the 16 bit
Microsoft Comic Chat Character Editor program (or any other 16-bit program) on their Windows 64 bit machine.
These procedures are step-by-step and cannot be short cutted!
Therefore it is in your best interest to read the entire page FIRST before following them through!
These instructions are divided into two parts:
Part 1 will install the Virtual Box and then the Windows XP operating system into it.
Part 2 will download the programs needed into the Windows XP environment and then install the Comic Chat Character Editor!
...Now let's get started...
ccedit
|
 |
Part 1MATERIALS DOWNLOAD
LIST |
Everything listed will be needed for a susccessful install:
|
 |
INSTALL
VirtualBox
 |
After you have read this page,
and have downloaded the items in the "Part 1 Materials Download List"!
It is time to install Oracle's VirtualBox
(The following tutorial can be found also in the "VirtualBox User Manual"
page 8 section 1.7: "Creating Your First Virtual Machine".)
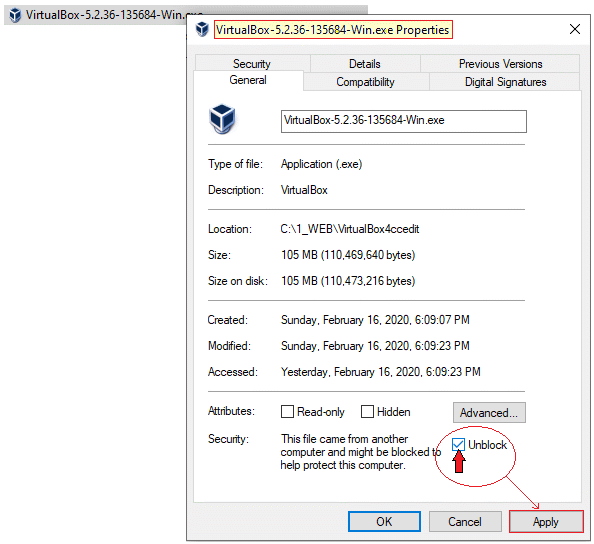
- Right click on the downloaded file "VirtualBox-6.1.4-136177-Win.exe" and select "Properties". Then at the bottom of the Pop-Up box,
check to see if there is an "unblock" option. If there is, then select to unblock it and then click "Apply"
- Now right-click on the installation file "VirtualBox-6.1.2-135663-Win.exe" once again and this time select
 "Run as Administrator" to begin! "Run as Administrator" to begin!
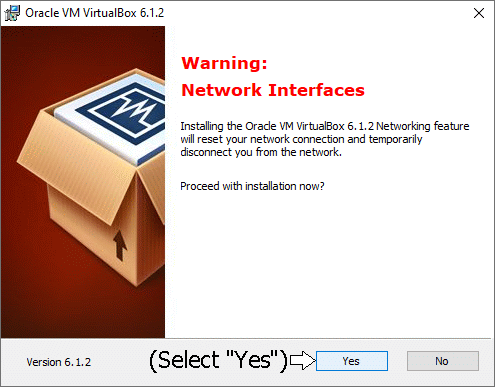
As the installation begins you will get a "network" alert:
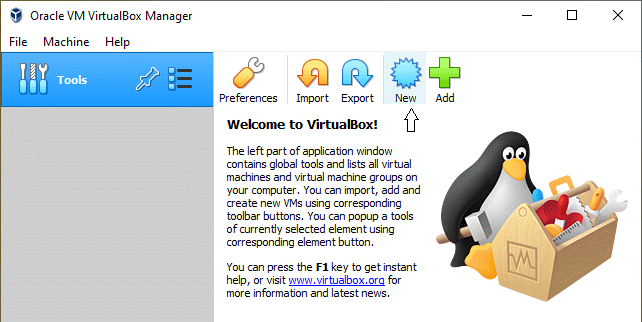
- Once the "installation is complete", go ahead and start the program by clicking "Finish". The "Oracle VM VirtualBox Manager" will appear.
Just above and to the left of the penguin, click the "New" button.

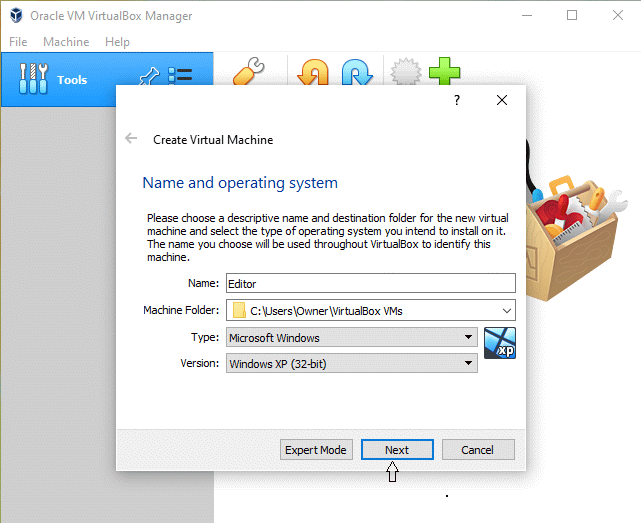
- Name and operating system:
- Name: "Editor" (or whatever name you desire)
- Type: "Microsoft Windows"
- Version: Windows XP (32-bit)

-
Next: "Create Virtual Machine" ..."Memory size"
Select memory size you can afford to use dependng on how much
your machine has installed, then click "Next"

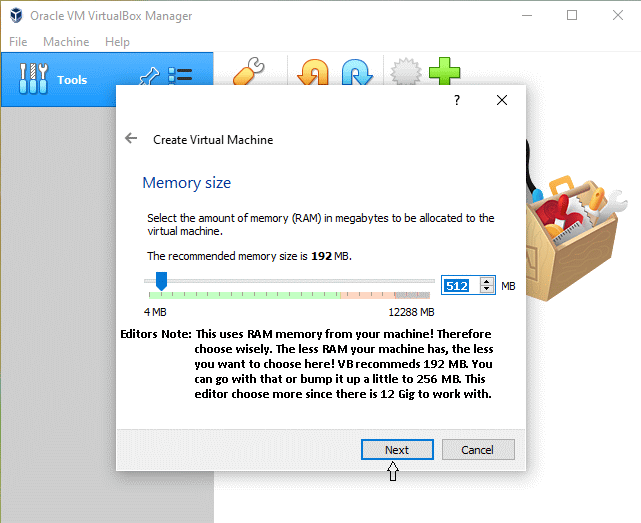
- Keep clicking "Next" till "Create Virtual Machine" ..."Hard disk"
Select..
"Create a virtual hard disk now"...

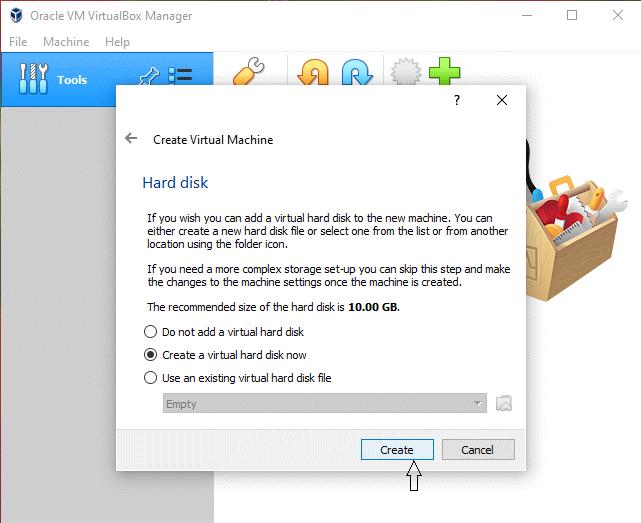
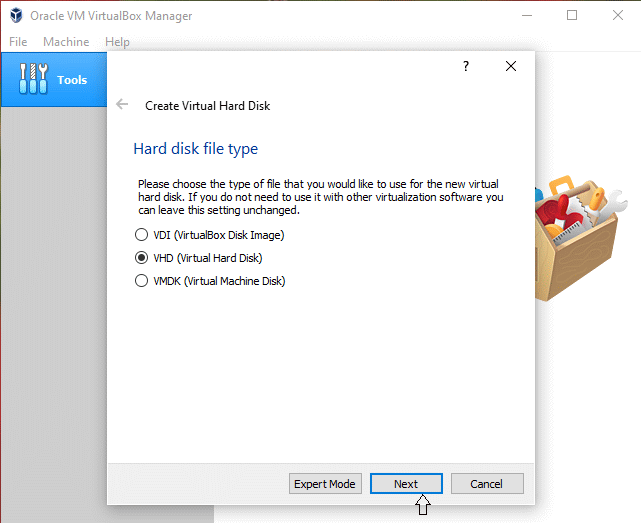
- Next "Hard disk file type": Select "VHD"...
VDI vs VHD Differences

- Next "Storage on physical hard disk": Select "Dynamicly allocated"...

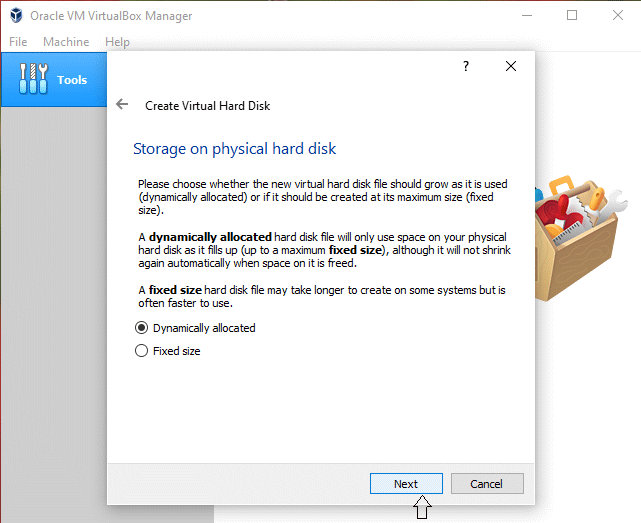
- Next "File location and size": Choose your desired VHD size then select: "Create"... (This editor choose to allow default location and chose 10 GB size)

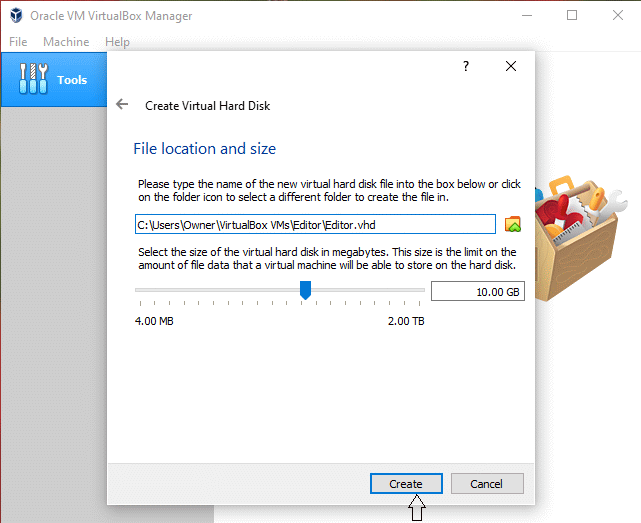
Congradualtions! You've just created a VirtualBox on your machine!
 |
 |
INSTALL
WINDOWS XP
 |
After you have installed Oracle's VirtualBox,
it is time to install Windows XP into the VirtualBox environment
(The following tutorial can be found also in the "VirtualBox User Manual"
page 11 section 1.8: "Running your Virtual Machine".)
- In the "VirtualBox Manager window", Right click on the "Start" diamond and select "Normal Start". Now if everything is cool, the "First Start Wizzard"
should open up. If you get any errors at this point, you will need to stop and resolve the error before you can continue. (example: AMD-V or VT-x error)
Please go to the "ERRORS" page for help!
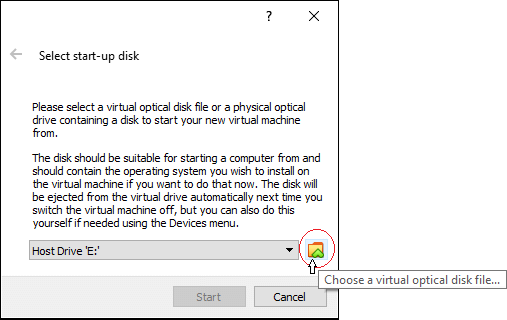
- If the "First Start Wizzard" does open, then you may continue to install Windows XP into your VirtualBox.
Click the little folder located on the right hand side of "Host drive 'E:'" and navigate to the WindowsXp.ISO file that you downloaded earlier from the
"Part 1 Materials Download List":

-
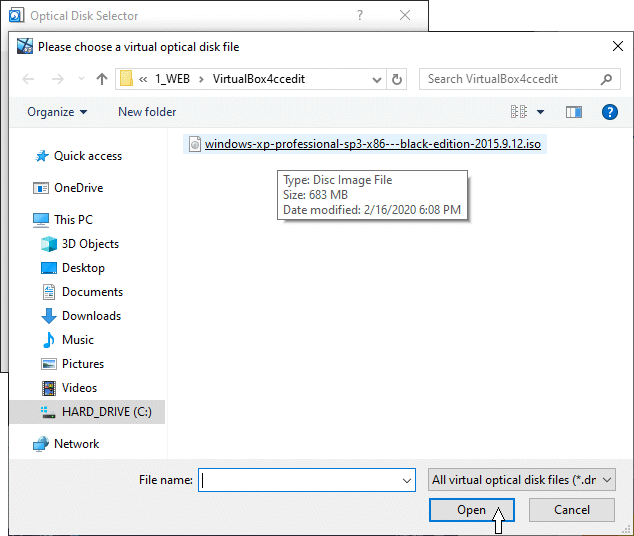
Navigate to the file:
"windows-xp-professional-sp3-x86---black-edition-2015.9.12.iso"
Select it first and then click "Open" at the bottom of the box:

-
Make sure that the .iso file is still "selected" in the next window and then click "Choose"

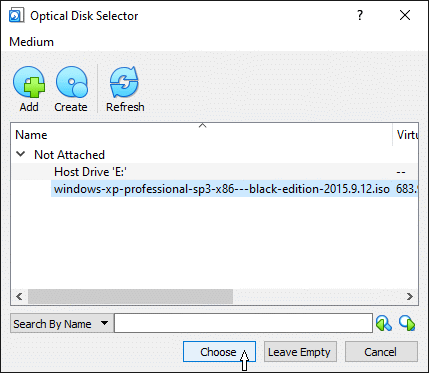
- Now you are ready to install the Windows XP 32-bit operating system!
Select "Start" to begin!

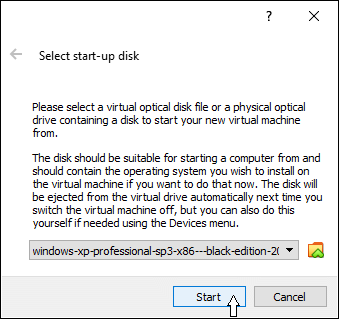
The installation will take some time so sit back and relax while it installs.
This Windows XP package has additional useful applications added to the installation package string. You may choose to
install them or deselect ones
that you may not want when the proper pop-up window presents itself. I would strongly suggest that you definitely allow it to at least install the
"7-Zip" archive program! The 7-Zip program will be needed later to unzip the "ApCompat.zip" file while within the bounderies of your newly created
Windows XP environment. - More information will be in Part 2: "Installing the Character Editor".

|
 |
This next section must be performed from inside the Windows XP "Virtual Environment"! |
 |
Part 2MATERIALS DOWNLOAD
LIST |
After you have installed Windows XP,
you must enter the Windows XP environment and open the web browser and go download this next list of files into the Windows XP environment!
Files needed to install and operate the 16-bit Comic Chat Character Editor:
- ApCompat extracted from Windows 2000 Pro Install Disk (112k)
Needed to install and then initiate Microsoft Character Editor for the first time
From: http://www.mermeliz.com/download/Win10Edit/apcompat.zip
- Character Editor To create Comic Chat characters (1.86Meg)
From: http://www.mermeliz.com/ccedit.htm
- BONUS EXTRA-1:
WS_FTP To upload characters from the "Windows XP" VM (690K)
This was the last free version released by "WS_FTP". It is no longer being offered, ENJOY!
- BONUS EXTRA-2:
7-Zip A free archival program (1.14M) 64-bit version (1.38M)  |
 |
INSTALL
CHARACTER EDITOR
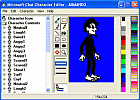 |
After you have installed Windows XP and have downloaded the files listed in the "Part 2 Materials Download List" from the browser of your new
Windows XP environment, you are ready to install the 16-bit Microsoft Comic Chat Character Editor
into the "Windows XP" environment
within "Oracle's VirtualBox"
- First unzip the apcompat.zip file using 7-zip. Using Windows Explorer, you can navigate to the file wherever you put it on your hard drive.
Right click the file "apcompat.zip" and select 7-Zip and "extract here".
- You can install this from the "Run" command line (recommended) or just right click on the newly unzipped "apcompat.exe" file and select
 "Run as Administrator" to begin! "Run as Administrator" to begin!
Then:
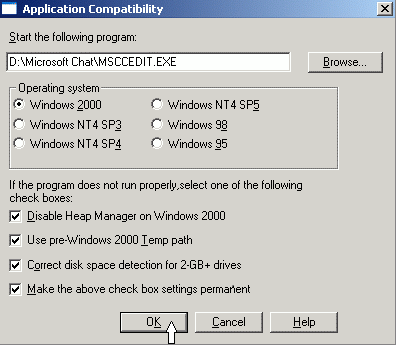
- Use the "Browse" button in the 'APCOMPAT' panel to find the 'Character Editor' (msccedit.exe) installation file you downloaded to
your Windows XP environment
- Next, refer to the graphic below to set up the ApCompat tool by checking the boxes you see checked in the graphic.
- Then click 'OK' and let the program install the 'Character Editor'.

 |
 |
STOP!
DO NOT ATTEMPT
TO START
THE CHARACTER EDITOR! |
-
In order for the Character Editor to function properly, it MUST be started the VERY first time using the ApCompat program!
If one accidently starts the Editor by clicking on the ccedit.exe file, then it has to be unistalled,
reboot the Windows XP program and then reinstalled again using the ApCompat tool once again.
After your installation of the Character Editor, restart the 'APCOMPAT' program inside the "Windows XP" environment
on your Windows 64-bit (Win 8.1, 10, 11) machine and set it up as per the graphic seen below:
- This time one browses to the actual 'Character Editor' program file C:\Program Files\Microsoft Chat Character Editor\CCEDIT.EXE
- Check the boxes the same as they are checked in the graphic below. Then click 'OK'

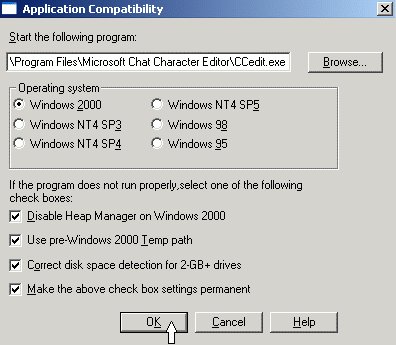
This will actually start the Character Editor and make it run as if it is within a system
it is compatible to.
Once you close the programs and reboot Windows XP, you may
then use the regular 'Comic Character Editor' program short-cut
to start the Editor inside the "Oracle VirtualBox"
environment! The ApCompat is no longer required!
 You are finished and ready to 'Rock and Roll'! You are finished and ready to 'Rock and Roll'!
 |
 |
HELPS
 |
 Oracle's VirtualBox: Oracle's VirtualBox:
 Microsoft Comic Chat Character Editor: Microsoft Comic Chat Character Editor:

Click  Home Home
|


![]()


